Hardware User Guide
Intro
Every project you will work on varies, so some of these instructions may not be applicable to your project. Be sure as you work to keep track of your notes in your Photo Production Log. Good luck!
Before you get started
The arduino requires a driver to show up as a com port on your computer. In most cases it will automatically be installed via windows updates. However if you want a direct link to the driver that will let the arduino show up as a com port properly please use the following links.
http://www.zcapture.com/drivers.zip
http://arduino.cc/en/Guide/UnoDriversWindowsXP
If the device is not detected the first time you plug it in, you may need to go into your device manager, find the Arduino Uno and click update driver.
Setting Up The Shot
Setting up a shot can be very time consuming, and each setup varies per project. For every project you will be using the Z-Capture Device to do 360° views, and this should be one of the first things you set up. Be sure to set up the white seamless or other table covers first if you will be placing the Z-Capture device on top.
Setting up the Z-Capture Device:
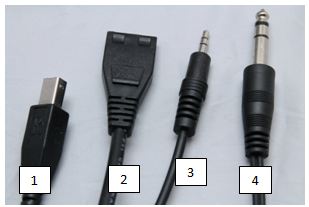
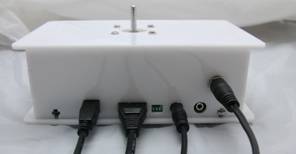
Place the device on the table and plug it in. View the diagram below to understand all of the chords, where they go, and what they do:
1 - USB Cord: This connects the Z-Capture Device to the computer so that you can change settings on the device. It also supplies power to the Z-Capture device if it is not plugged into the power adaptor.
2 - Power Cord: This connects the Z-Capture Device to the power supply.
3 - Camera Cord: This connects the Z-Capture Device to the camera so that it communicates with the camera and sets the shutter off after each step of the rotation.
4 - Remote Control Cord: This connects to the remote control that allows you to start and stop a sequence or to start the Z-Capture to start rotating.
Next, place the rotator disk on the pole of the Z-Capture Device. For some projects you may find it useful to use a pole instead of a disk to rotate the object. It is optional, but you may want to set up a table top beneath the rotator disk, which you would have to set up first. Using a tabletop can be quite useful as it provides a raised work space.
How to Set Up the Tabletop (optional):- Place the tabletop frame around the Z-Capture Device.
- Place the tabletop board on the frame, making sure to line the hole up with the Z-Capture device so that the pole pokes through.
- Find an appropriately sized disk for your project.
- Place the disk on the Z-Capture Device, being sure to securely mount it on the pole.
- Secure the disk on the pole by tightening the screw using the long tipped screw driver.
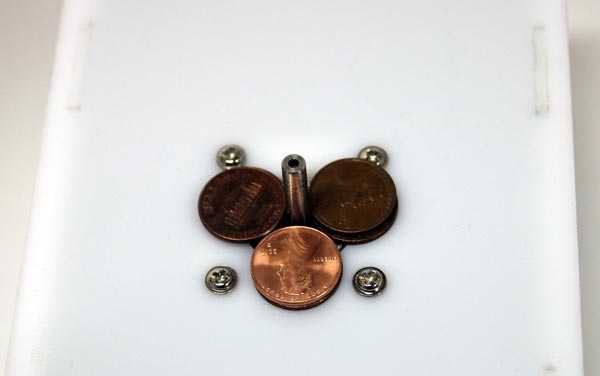
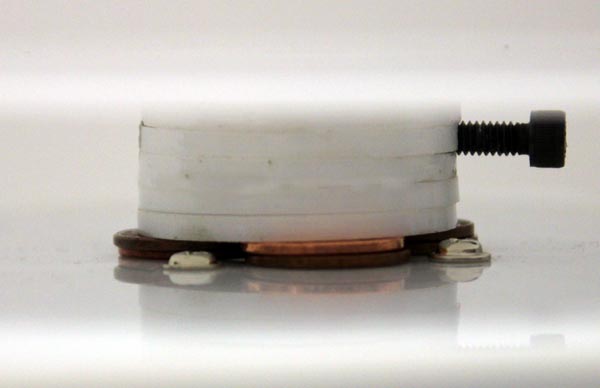
Leveling the platform
One quick tip to leveling the platform is to use a few spare coins. Simply stack the coins around the base of the drive shaft as shown and gently push down on the disk as you tighten the screw. This will help insure the disk is level. Don’t forget to remove the coins afterwards.
- Locate some tubing that fits over the pole of the Z-Capture device and cut it to the height you want it to be.
- Fit the tubing onto the rotator pole.
Setting Up the Camera and Product:
After you have set up the Z-Capture Device, it is time to start setting up the product and the camera. Because every project is different, there is no specific guidelines on how to set up a shot though there are some useful tips and basic guidelines that you should follow:
Tripod: Always use a tripod when shooting 360° for consistent views.
Cords: Be sure that the Z-Capture device is plugged into your camera. You may also want to get a power cord and a USB cable to plug the camera directly into the computer. To avoid trips, tie the chords around the tripod out of the way.
Shoot in Manual Mode: Keep your shooting mode in manual so that you have complete control over the process and so that exposures don't vary photo to photo. Check the exposure by looking at the preview on the camera screen.
White Balance: You can shoot in auto white balance, but generally I set the white balance manually. To set the white balance manually, take a photo of just white before putting the object in the shot. Next go the menu and set the photo as the white balance example.
Focus: Keep your camera on the manual setting. That way the focus will be consistent throughout the entire 360 rotation. Focus on the most important part of the object (generally the front or the logo), and keep this focus through the entire rotation.
ISO: Shoot at ISO 400 or lower to preserve clarity and prevent graininess.
Diffused Lighting: Use diffused lighting as much as possible to keep consistent lighting and to prevent strange highlights.
Keep a Consistent Background: There are several ways to keep a consistent background, so here are a few ways to do so: Use a Paper Disk: This is perhaps the easiest solution to creating a seamless background. Using a compass, draw and cut a circle out of white seamless scrap. Be sure that the circle will be large enough to hold the object but not too big that it creates too much drag. Position the disk to the plastic rotating disk, being sure to center it. You can match up where the hole from the compass is with the center of the plastic disk. Secure the paper disk to the plastic disk with tape or command strips. The paper disk will rotate with your object. Be sure to shoot at such an angle that you don't catch the edge of the paper.
Use a White Seamless: It is quite difficult, but there are some ways to mount some objects directly to the rotating pole and use only a white seamless as the background. Poke a hole through the white seamless where the rotating pole pokes out and mount the object to that, being careful to hide it.
Depth of Field: If you don't have a seamless background, you can play around with the focus and depth of field and sometimes blend the background with the foreground.
Center the Object: It is important that the object is centered on the axis point to prevent wobble and to keep a consistent composition.
Composition: For composition, try to fill the frame with the object that you can without letting it leave the shot as you rotate it.
Secure the Object: The object needs to be secured to its mount so that it won't move or fall during rotation. Use tape, glue, sticky tack, or some other method of securing your object. At the same time, be sure that the tape, glue, sticky tack, or whatever you are using to secure it is hidden in all the shots. Also avoid ripping the paper while adjusting or removing the object.
Use A Tent for Reflective Objects: Reflective Objects can be very difficult to shoot, and using a tent prevents other things from around the room reflecting into the object.
Tips
Remember you are shooting in 360° so be sure to rotate to object while setting it up to look for and fix any problems. Here are some things to look for while setting up your 360° shot:
Wobble: A wobble in your shot means that the object if off center. Find the center of the rotator disk and place the object as close to center as you can. Smaller objects are more problematic, and even the slightest adjustment, even by a millimeter, can throw it off balance. Alternate between moving the object and moving your camera around on the tripod to find the center.
Unbalanced Layout: Once you have found the center, move your camera around to get a balanced layout. You do not want any part of the object going out of the shot during rotation, so be sure to rotate the object plenty of times and check it to be sure that this does not happen. Try zooming in and out, moving the camera, or changing your angle.
Blurry or Out-Of-Focus: Be sure that you have good focus in all your shots. We only use manual focus in this process and only set it once at the beginning. Your focus is generally dependent on your f-stop; a higher f-stop will keep more of the object in focus, but keep in mind that a higher f-stop requires a longer exposure. Focus on the most important part of the object (generally the front or the logo), and be sure to double-check the focus before you shoot again.
Changing Background Color: Sometimes the disk bumps the background or the object reflects on the background, which can result in a background changing colors, or a flicker in the final exported file. If you are using a cloth background there could be wrinkles in it that cause shadows; generally using paper results in a better background. If you are using a paper disk on top of the plastic disk, sometimes you can see the edges of the disk and can create a problem. Because there are so many factors that may cause a changing background, there is no specific way to fix it; just fiddle around with it until you figure out a solution.
Reflections: If you have a reflective object, this can be a really big problem, especially when shooting in 360°; while one angle may be fine, another may have several reflections. When shooting a reflective object, it is best to shoot it in a tent to reduce reflections from the room. Using diffused lighting works very well too. If you rotate the object and find a problem area, figure out where the reflection is coming from, and fix it. If you can, sometimes you can get rid of reflections by changing the angle of the camera.
Falling or Moving Object: Sometimes as the object is moved, it may begin to fall over or move. There are a variety of ways to secure an object and sometimes it requires a lot of creativity. You want to prevent the object from falling over or moving from its original position, as this will create a jump as the rotation goes around back to the first frame. Make sure your object is secure and stable before you shoot. However, when you tape, sticky-tack, glue, or some other way secure the object to the rotating disk, be sure to hide the tape, glue, or whatever you used, so that it cannot be seen in any of the shots. If your object takes a while to settle down after rotating but does not move permanently, then you can change the settings on the Z-Capture device to accommodate this. There will be more on this later.
Wheel Not Turning Properly: Sometimes the disk gets caught on something which prevents it from rotating. Look around and fix what it is caught on.
Set the Settings on the Z-Capture Device
Important Note: When connecting via usb please insure the settings match the unit you have or it will not work properly
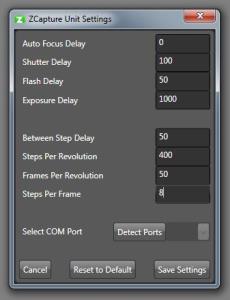
Zcapture Mini
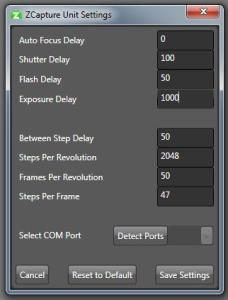
Zcapture Mid
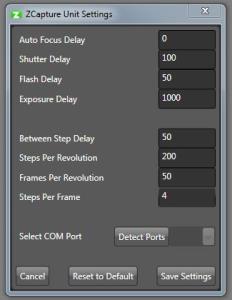
Zcapture Pro
Now that you have set up your shot and determined your camera settings, it is time to set the settings on the Z-Capture Device. Some of the settings on the Z-Capture device are dependent on your exposure time, so this is why we set these settings after we set up the shot.
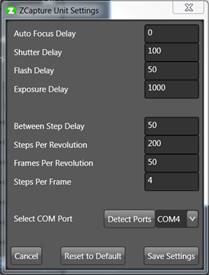
- 1. Using the USB cable, plug the Z-Capture device into the computer and open the Z-Capture software.
- 2. Click on "Unit Settings" and click "Detect Devices." From the drop-down menu next to it, select the Z-Capture device you are using.
- 3. Now you are ready to change the settings. Look at the diagram and definitions below to understand each setting. Remember that all units are measured in milliseconds, so 1,000 milliseconds = 1 second.
Auto Focus Delay: This is the delay for the camera's autofocus. Generally we do not use autofocus, so it is ok to leave this option at 0.
Shutter Delay: This is the delay that allows you to have a long exposure. If you have a number less than your exposure time, then the Z-Capture Device will rotate before your exposure is finished.
Flash Delay: This is the delay that allows your flash to charge. Because we use continuous lighting, this setting is not very important and you may leave it at 50 which is the default.
Exposure Delay: This is the delay between the Z-Capture Device to finish a rotation step and to set the shutter off. If you have an object that shakes a lot when it moves and takes a bit to settle down, it is good to set this to a high number.
Between Step Delay: This sets how long it should take to pause between steps. Often you do not need to change this number.
Steps Per Revolution: This number indicates how many steps the rotator takes to do a complete rotation. Leave this number at 200.
Frames per Revolution: This number indicates how many shots (or frames) you will be taking. Our default is 50, though if a client requests another number, this number should be adjusted. This number must multiply evenly into 200 (or number specified in Steps Per Revolution setting) with the number specified in the Steps Per Frame setting.
Steps Per Frame: This number indicates how many steps the Z-Capture Device takes between each frame. This number must multiply evenly into 200 (or number specified in Steps Per Revolution setting) with the number specified in the Frames Per Revolution setting.
Be sure to hit "Save Settings" before when you are finished before exiting. This will send the settings to the Z-Capture device.
Take the Picture Sequence
After you have finished setting up your shot and setting the Z-Capture Settings, it is time to start shooting! Here are the basic steps and things to remember to shoot a sequence:
- 1. Check your focus just before shooting.
- 2. To keep track of what sequence or take you are on you should write what it is on a piece of paper take a picture of it in the shot and then begin the sequence. That way, when you upload hundreds of photos at once, you haven't lost track of what photos belong to which folder.
- 3. Start the sequence! Press the black button on the control connected to the Z-Capture Device.
- 4. Do not bump the setup or the camera while it is capturing as this can create a jump in the rotation.
- 5. To cancel, hold down the red button on the control. It may take a while for the picture to stop shooting.
- 6. When it has completed a rotation it is time to upload the photos to the computer.